
If you teach in Penn Engineering or the Master of Health Care Innovation (PSOM) program, you can enable Slack from the navigation menu of your Canvas site.
- Log in to Canvas and select the course site from your Dashboard.
- Click Settings from the left side menu.
- Click the Navigation tab.
- Locate the Slack item from the bottom group of menu items. Drag/drop or move it into the top group of items. Place it anywhere within this top group; these items can be re-ordered based on how you wish them to display for students.
- Scroll to the bottom of the page and click Save.
Instructors in all other participating programs must request for Slack to be enabled at the course level. Please contact canvas@pobox.upenn.edu with your Canvas course number and ask for Slack to be enabled.
Once Slack has been enabled for your Canvas site, you will need to create and join the course workspace.
- Log in to Canvas and select the course site from your Dashboard.
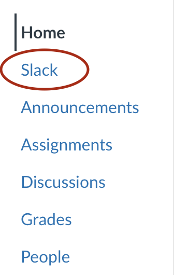
- Click Slack from the left side menu. If this menu item does not appear, select Settings > Navigation and move or drag the Slack item up into the top menu group. Save and return to the course home page to select Slack from the menu.
- If this is your first time logging into a Penn Slack account, you may receive the “unavailable” message shown below and will need to log in with your PennKey.
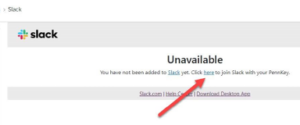
- After logging in with your PennKey, refresh the page or return to your Canvas site and again click Slack from the left side menu.
- Click the button to Create Slack Workspace.

- Log in using either the desktop/mobile or web app. You may download Slack for Windows or Mac OS, visit the App Store or Google Play Store to download a mobile version, or continue in your browser.

You have now created and joined a workspace for your course. If you plan to use Slack in multiple courses, repeat steps 1-2, then skip directly to step 5 for each course. Once you have added all of your workspaces, you will be able to switch between them in the Slack app or access each workspace through its Canvas site.
If you’re not already familiar with Slack, we recommend the very brief (0:46) video below to learn about some of its main features:
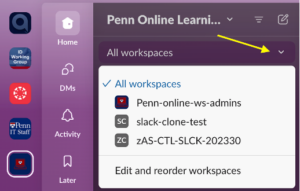
All course workspaces exist within an enterprise grid called Penn Online Learning, which appears in the top left of your Slack window and is indicated by the logo below:
![]()
Within the Penn Online Learning grid are workspaces for each course in which you have enabled Slack. By default, channels and messages from all workspaces are displayed. You may select or switch between workspaces using the drop-down list that appears below the words “Penn Online Learning” in the web or desktop app (below left), or the expander menu in the mobile app (below right).
Note that this drop-down list will not appear if you are only enrolled in one workspace.
A Slack channel is a conversation thread about a specific, ongoing topic. Public channels may be accessed by anyone in the workspace, while private channels are limited to invited users. Each user can subscribe or unsubscribe to channels as they prefer. Subscribing to a channel means that you can view and participate in the conversation and will receive notifications (according to the preferences you select) when someone posts.
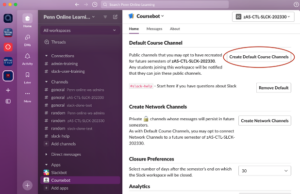
Instructors may want to proactively create channels that all students should subscribe to, such as #announcements or #homework-help. Use Coursebot to create these as default channels that automatically subscribe all users, whether they join the workspace before or after the channel is created. To create a default channel:
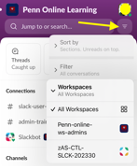
- From the left side workspace menu, select Coursebot (circled below).
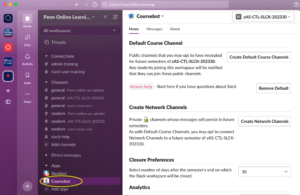
- In the top right corner, use the drop-down list to select the course workspace where you would like to create the channel.
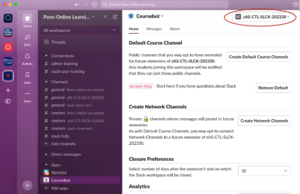
- Click Create Default Course Channels.
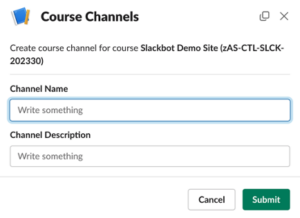
- Give the channel a name and (optional) description. Click Submit.
- Repeat for any additional default channels you wish to create.
You may also follow this process to create network channels. These should only be used for conversations that continue across semesters and are not tied to an individual course, for example, conversations among a student cohort throughout their program. To create a network channel, follow the process described above for default channels, but in Step 2, click Create Network Channels instead.
You may repeat this process for additional courses by using the drop-down list in the top right corner (pictured in Step 2 above) to select a different workspace, then repeating the remaining steps to add default and/or network channels.
Coursebot also provides instructors with access to information about the course workspace and user analytics. Click Coursebot from the left side workspace menu to locate these options.
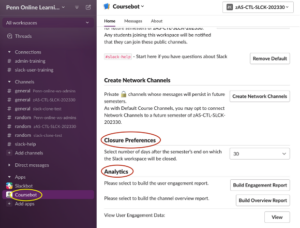
Closure Preferences
By default, workspaces close 30 days after the end of the semester. This preference can be edited from the drop-down list. Default and network channels can be added to future semesters’ courses, and conversations in network channels will continue to be visible in future courses.
Analytics
The Analytics section of Coursebot displays information about how students are using Slack in your course.
The user engagement report details the frequency with which each user engages in different types of interactions, such as sending and replying to messages or using message reactions.
The channel overview report provides a list of all channels in the course workspace, which users created the channels, and how many users are subscribed to each one.
You may also view user engagement data for an individualized view of the same information included on the user engagement report.